


Hey there, fellow React explorers! 🚀 Ready to take your React skills up a notch? Today, I’m going to walk you through the steps to fetch data from an API in React applications. Don’t worry if you’re new to this – I’ve got your back every step of the way. Let’s dive in and unravel the magic of data retrieval!
Why Fetch Data from an API?
Before we get our hands dirty, let’s talk about why fetching data from APIs is like adding rocket fuel to your React projects. APIs (Application Programming Interfaces) are like data treasure chests, packed with information waiting to be used. By fetching data from APIs, you can:
- Create Dynamic Content: Imagine displaying real-time weather updates, the latest news, or even cat memes on your website. APIs make it possible!
- Stay Up-to-Date: Keep your app’s data current without manual updates. The API does the heavy lifting for you.
- Build Interactive Apps: Fetching data opens doors to building interactive and responsive apps that cater to your users’ needs.
Steps To Fetch Data From an API in React
Here’s a step-by-step guide to fetch data from an API in React, follow the below-mentioned steps and you can seamlessly fetch the data from the API:
Step 1: Find the Perfect API
The first step on our adventure is finding an API that suits your project. There are APIs for almost everything – from weather forecasts to movie databases and more. Here are a few popular ones to get you started:
- OpenWeatherMap API: Fetch weather data for your app.
- The Cat API: Because who doesn’t love cat pictures?
- JSONPlaceholder: A fake REST API for testing and prototyping.
Step 2: Create a New React App
If you haven’t set up your React environment yet, fear not! Create a new React app using Create React App or your preferred method.
Step 3: Fetch Data with the “fetch” API
Time to roll up our sleeves and fetch some data! In your React component (let’s call it DataFetching.js), add the following code to fetch data from your chosen API:

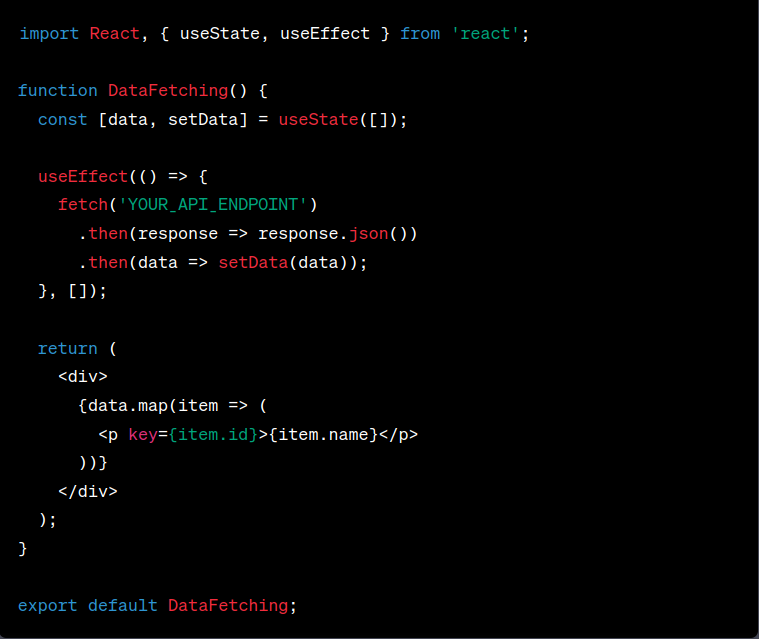
Replace ‘YOUR_API_ENDPOINT’ with the actual URL of the API you want to fetch data from. This code snippet uses React’s useState and useEffect hooks to manage the fetched data and make the API call.
Step 4: Display the Data
Now that you’ve fetched the data, let’s display it on your app. In the above code, we’re rendering a list of items using the map function. Feel free to customize the rendering based on your API’s data structure.
Step 5: Run Your App and Marvel at the Magic
With everything set up, run your React app using the terminal command npm start and open it in your browser. Voilà! You’ve just fetched and displayed data from an API using the power of React.
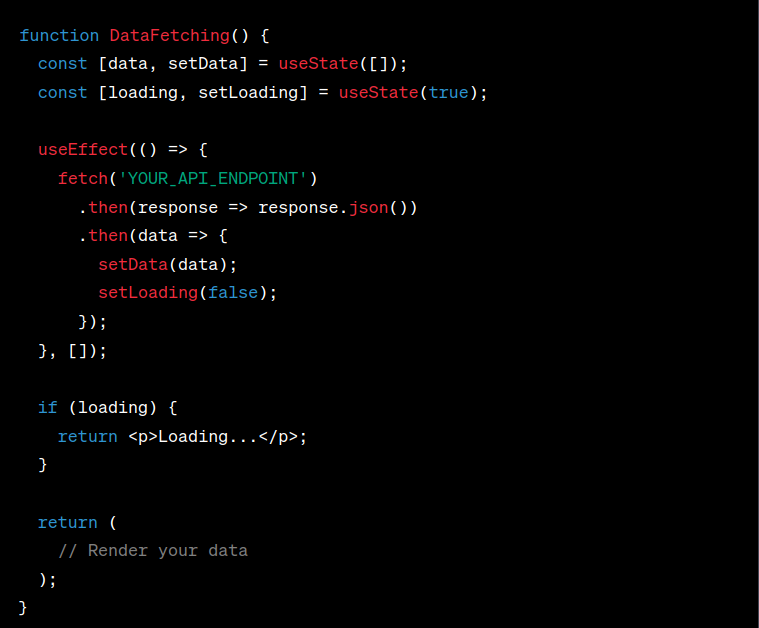
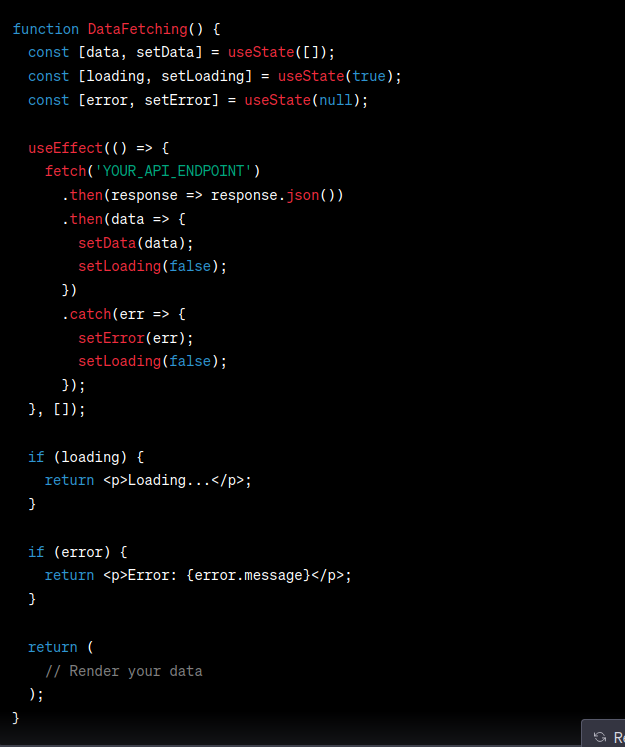
Bonus Tips: Handling Loading and Errors
Fetching data isn’t always a smooth ride. Sometimes, there might be a slight delay or even an error. Here’s how you can handle these scenarios:
- Loading State: Add a loading state to your component to display a loading indicator while fetching data.

- Error Handling: Add error handling in case the API call encounters an issue.

Wrapping Up
There you have it, my React comrades! You’ve ventured into the world of fetching data from APIs and conquered it like a true hero. With this skill under your belt, you’re well-equipped to create dynamic, data-driven applications that dazzle your users.
Remember, practice makes perfect. Feel free to explore different APIs, experiment with different data structures, and let your creativity run wild.
If you’re excited to share your API-fetching triumphs or have any questions along the way, drop a comment below. Happy coding, and may your data be ever-fetching! 🌟📊