Automating Desktop using RobotJS

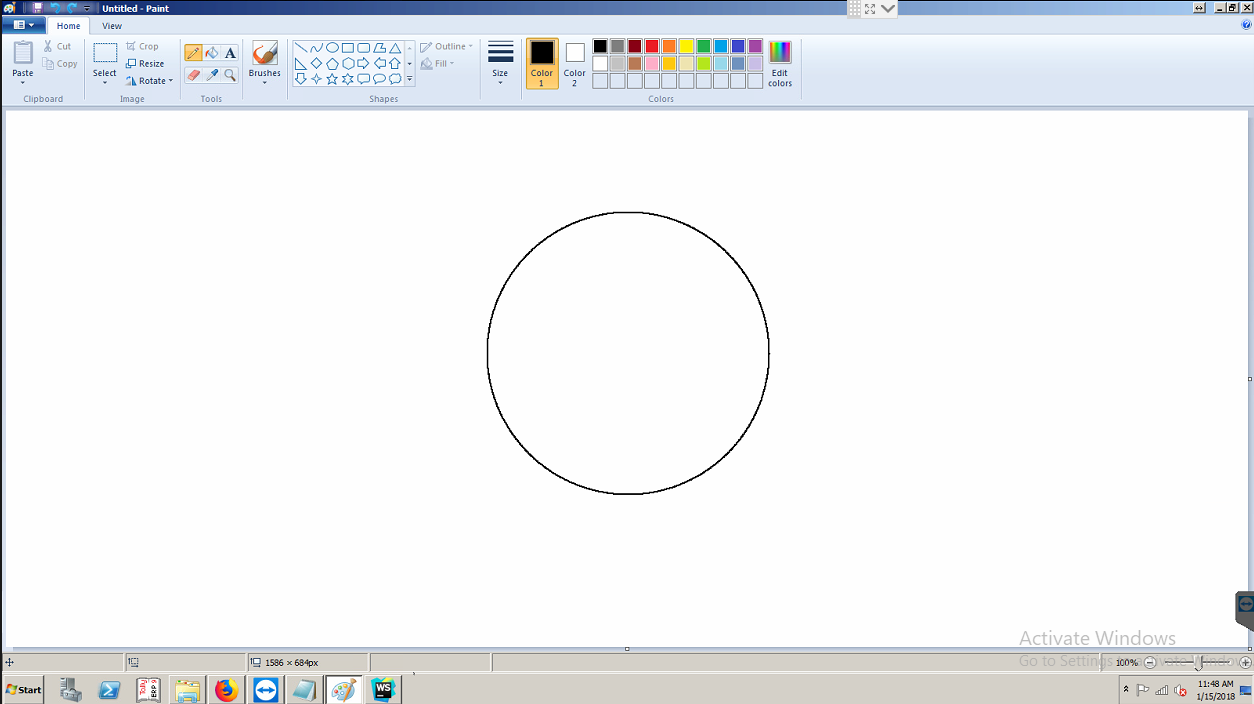
RobotJS package gives users ability to control mouse and keyboard of the desktop. In our demo, we will try to draw a circle in MS Paint by controlling mouse actions. Here we will be using version 0.47 of RobotJS.

Development Environment:

  1. JetBrains Webstorm
  2. NPM 5.5.1

We will start by creating a simple node application in WebStorm.

Installing RobotJS:

Enter following command in terminal:

npm install robotjs --save

WebStorm creates a lot of boilerplate for us.

Next, we will set a route in our app.js as ‘draw’ where we will be adding our actions to draw different types of shapes.

... ... var index = require('./routes/index'); var users = require('./routes/users'); var draw = require('./routes/draw'); ... ... app.use('/', index); app.use('/users', users); app.use('/draw', draw); ... ...
Code language: PHP (php)

Next, we will create ‘draw.js’ file in ‘routes’ directory of the project.

We will be using the polar form of the circle ie.:

x = R * cosθ y = R * sinθ

for drawing the points of the circle by using angles ranging from 0-360.

Robot class provides following methods for keyboard and mouse events:

  1. robot.keyTap(“tab”, “alt”) -> Performs a single keypress (first argument is a key and second argument is a modifier).
  2. robot.getScreenSize() -> Returns the size of the desktop screen.
  3. robot.setMouseDelay(0) -> Sets the delay in milliseconds to sleep after a mouse event.
  4. robot.moveMouse(x, y) -> Moves mouse to x, y human like, with the mouse button up.
  5. robot.mouseClick(“left”, false) -> Clicks the mouse (first argument is the mouse key and second argument is for double key press).

The draw.js class is as below:

var express = require('express'); var robot = require("robotjs"); var router = express.Router(); router.get('/circle', function(req, res) { robot.keyTap("tab", "alt"); var screenSize = robot.getScreenSize(); var height = screenSize.height; var width = screenSize.width; var centerX = width / 2; var centerY = height / 2; var radius = Math.min(width, height) / 5; robot.setMouseDelay(0); for (var angle = 0; angle < 360; angle += 0.25) { var x = centerX + (radius * Math.cos(toDegrees(angle))); var y = centerY + (radius * Math.sin(toDegrees(angle))); robot.moveMouse(x, y); robot.mouseClick("left", false); } res.send('Bot at work'); }); function toDegrees (angle) { return angle * (180 / Math.PI); } module.exports = router;
Code language: JavaScript (javascript)

Final Drawing:

Circle drew by Robot events

Posted

in

by

Tags:

Recent Post

  • How to Connect A Biometric Attendance Device to a System through JS and Node.js?

    In the world of highly advanced workspaces, the utilization of biometric attendance structures has come to be important for accurate and steady tracking of worker or student attendance. This blog publishes objectives to provide a complete guide on integrating a biometric attendance device with a gadget with the use of JavaScript and Node.Js. By making […]

  • How to Implement File Uploads in Node.js with Multer?

    For many web applications that let users share papers, photos, and other types of material, file uploads are a necessary functionality. Multer is a well-liked middleware used for Handling file uploads in Node.js using Multer middleware.in the Node.js environment to effectively handle file uploads. We’ll look at how to use Multer to create file uploads […]

  • How to Use Local Storage to Persist Data in a JavaScript Application?

    Data persistence is a key aspect of web applications. In JavaScript, one of the primary tools for achieving this is Local Storage, a part of the Web Storage API. This JavaScript data persistence tool provides a simple key-value storage mechanism within the user’s browser. Unlike session storage, which persists data only during a session, Local […]

  • How to Use WordPress API?

    WordPress stands out as a leading content management system, celebrated for its dynamic capabilities in website and blog development. Renowned for its rich feature set and extensive customization options, WordPress empowers creators to fashion captivating online experiences. In recent times, WordPress has expanded its horizons into the realm of APIs, granting developers a potent tool […]

  • How to Use Post and Pre Hooks in Mongoose?

    In Mongoose, a widely-used library for working with MongoDB, there are valuable tools called “Pre and Post Hooks.” These hooks, also known as “Mongoose Middleware” or “Mongoose Model Hooks,” allow developers to run their own code just before or after specific actions on the database. With “Pre Hooks,” you can customize actions before they happen, […]

  • How To Create Reusable Components in React: Best Practices

    Rеact is a popular library for building usеr intеrfacеs with JavaScript. One of the main benefits of Rеact is its ability to create reusable componеnts that can be used in different parts of your application. Reusable componеnts can help you savе timе, rеducе codе duplication, and еnsurе consistеncy in your UI. However, creating rеusablе componеnts […]